杰网资源 Design By www.escxy.com
文字部分制作相对容易很多,跟一般的立体字制作方法相同。虎头部分可能难度大一点,要用到鼠绘。
最终效果

1、新建一个800 * 600像素的文件,背景填充白色,新建一个图层,用钢笔工具勾出“2010”文字路径,转为选区后填充黑色。一个文字一个图层,连写的放在一个图层,效果如下图。

<图1> 2、先从开头的文字开始,先用钢笔工具勾出图2所示的选区,锁定图层后,拉上图3所示的线性渐变。
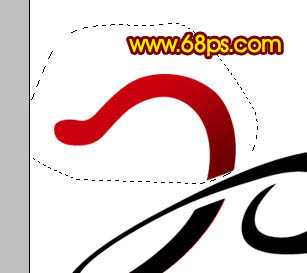
<图2>

<图3>
3、同样的方法用套索或钢笔勾出其它部分,拉上渐变色,效果如图4,5。

<图4>

<图5> 4、新建一个图层,用钢笔勾出下图所示的选区,选择渐变工具,颜色设置如图7,拉出图8所示的线性渐变。

<图6>

<图7>

<图8> 5、新建一个图层,用钢笔勾出图9所示的路径,拉上图10所示的线性渐变色。

<图9>

<图10>
6、新建一个图层,制作高光部分,先用钢笔勾出图11所示的选区,填充颜色:#F3BFA4,取消选区后加上图层蒙版,用黑色画笔把边缘涂掉,其它部分的高光制作方法相同,如图12,13。

<图11>

<图12>

<图13> 上一页12 下一页 阅读全文
最终效果

1、新建一个800 * 600像素的文件,背景填充白色,新建一个图层,用钢笔工具勾出“2010”文字路径,转为选区后填充黑色。一个文字一个图层,连写的放在一个图层,效果如下图。

<图1> 2、先从开头的文字开始,先用钢笔工具勾出图2所示的选区,锁定图层后,拉上图3所示的线性渐变。

<图2>

<图3>
3、同样的方法用套索或钢笔勾出其它部分,拉上渐变色,效果如图4,5。

<图4>

<图5> 4、新建一个图层,用钢笔勾出下图所示的选区,选择渐变工具,颜色设置如图7,拉出图8所示的线性渐变。

<图6>

<图7>

<图8> 5、新建一个图层,用钢笔勾出图9所示的路径,拉上图10所示的线性渐变色。

<图9>

<图10>
6、新建一个图层,制作高光部分,先用钢笔勾出图11所示的选区,填充颜色:#F3BFA4,取消选区后加上图层蒙版,用黑色画笔把边缘涂掉,其它部分的高光制作方法相同,如图12,13。

<图11>

<图12>

<图13> 上一页12 下一页 阅读全文
标签:
蓝色,液晶显示器,海报
杰网资源 Design By www.escxy.com
广告合作:本站广告合作请联系QQ:858582 申请时备注:广告合作(否则不回)
免责声明:本站文章均来自网站采集或用户投稿,网站不提供任何软件下载或自行开发的软件! 如有用户或公司发现本站内容信息存在侵权行为,请邮件告知! 858582#qq.com
免责声明:本站文章均来自网站采集或用户投稿,网站不提供任何软件下载或自行开发的软件! 如有用户或公司发现本站内容信息存在侵权行为,请邮件告知! 858582#qq.com
杰网资源 Design By www.escxy.com
暂无评论...
最新文章
友情链接
杰网资源 Design By www.escxy.com


